In today’s environment of shrinking cost margins and increased regulations, maintaining properly calibrated equipment becomes ever important. Even the smallest inaccuracy in process measurements can cause a significant loss in revenue, especially if the process handles large volumes. Electronic equipment can lose accuracy over a period of time, leading to incorrect readings; this is where calibration comes in. Calibrating electronic equipment, in this case transmitters, brings the measured values of the device in line with a known value from an applied standard.
Instrument Loops
In order to understand transmitter calibration, it may be beneficial to first review instrument loops. An instrument loop refers to a configuration of equipment, connected in such a way to deliver power to all devices and obtain a reading from these devices. An instrument loop can be either electrical or pneumatic. The figure below shows a simple instrument loop with a power supply, transmitter, and a meter to measure current in the loop.
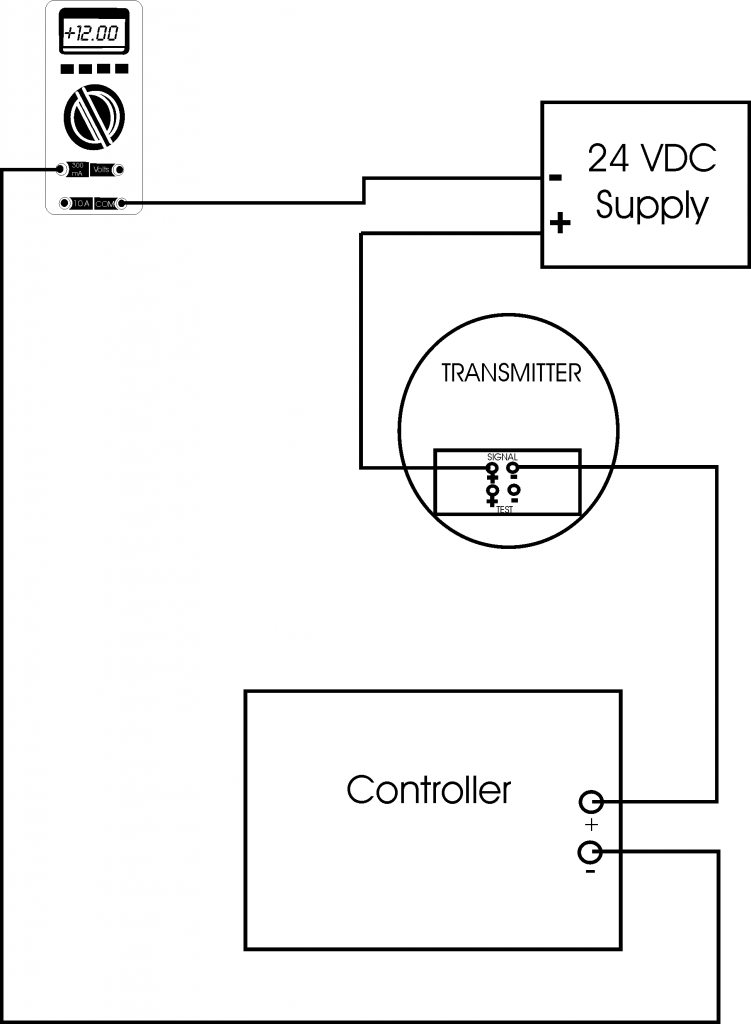
Notice that in this loop, the power supplied to the transmitter is connected in series with the controller and the measuring device. Power is delivered by the power supply to the transmitter. Here, a measurement is made of the measured variable (flow, for instance) and this measurement is converted into a 4-20 milliamp output from the transmitter. This 4-20 mA signal is then sent to the controller, as well as to an ammeter to measure the current.
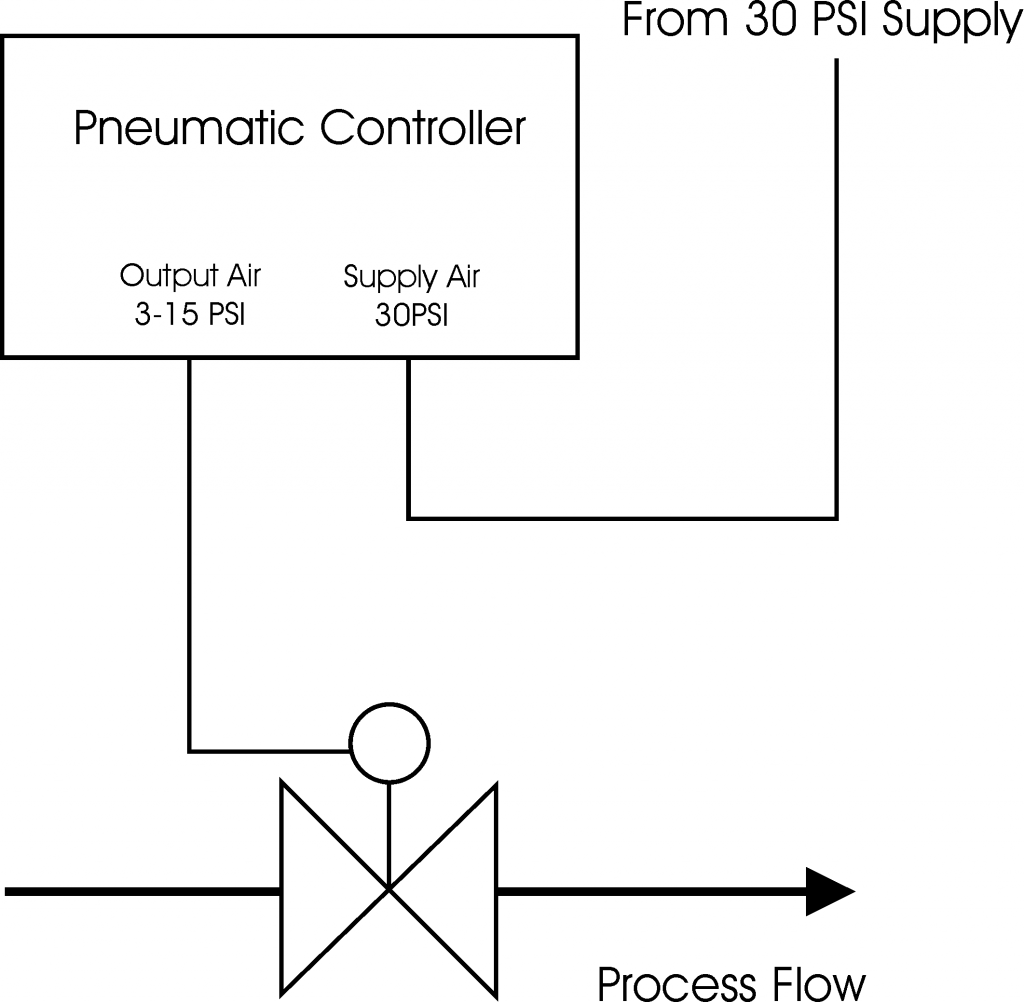
By far, the most common current loops are 4-20 milliamp loops. These loops are designed so that 4 milliamps generates a 0% output and 20 milliamps generates a 100% output. The most common pneumatic loops are 3-15 psi loops, shown the figure below. These loops produce 3 psi for a 0% output and 15 psi for a 100% output. Pneumatic loops work the same as electronic loops, but use air rather than current.
Smart Transmitters
Smart transmitters are microprocessor-based transmitters that are capable of being reprogrammed with various parameters without the need for board replacement. Smart transmitters are more accurate than traditional analog transmitters, have a much greater turndown ratio, and are much easier to calibrate.
Calibration Guidelines
All calibrations should follow some general guidelines, which are true of any type of transmitter, smart or traditional. Some of the guidelines are discussed here.
Primary vs. Secondary standards
- Primary standards produce a certified output that can be used to calibrate a piece of equipment. Deadweight testers are examples of primary standards. These devices use a precision mass to measure pressure.
- Secondary standards typically measure a variable with a transducer or electronics, then display it electronically.
Gravitational Constants and Corrections
Since the gravitational constant throughout the world changes slightly from place to place, this must be taken into account when using a primary or mass-to-pressure device like a dead weight tester. When using a primary tester to calibrate an instrument, make sure that the weights have the proper gravitational constant stamped on them for the area the tester is being used in. Some commonly used constants are below:
- “Standard/International” gravity is 980.665 cm/sec2
- US mean gravity is 980.000 cm/sec2
All instrument calibrations should be made to .1% of calibrated span.
General Calibration Routine
All calibrations have common elements. The following is a general procedure for performing any calibration:
- Isolate the transmitter from the source. This means taking the transmitter off service.
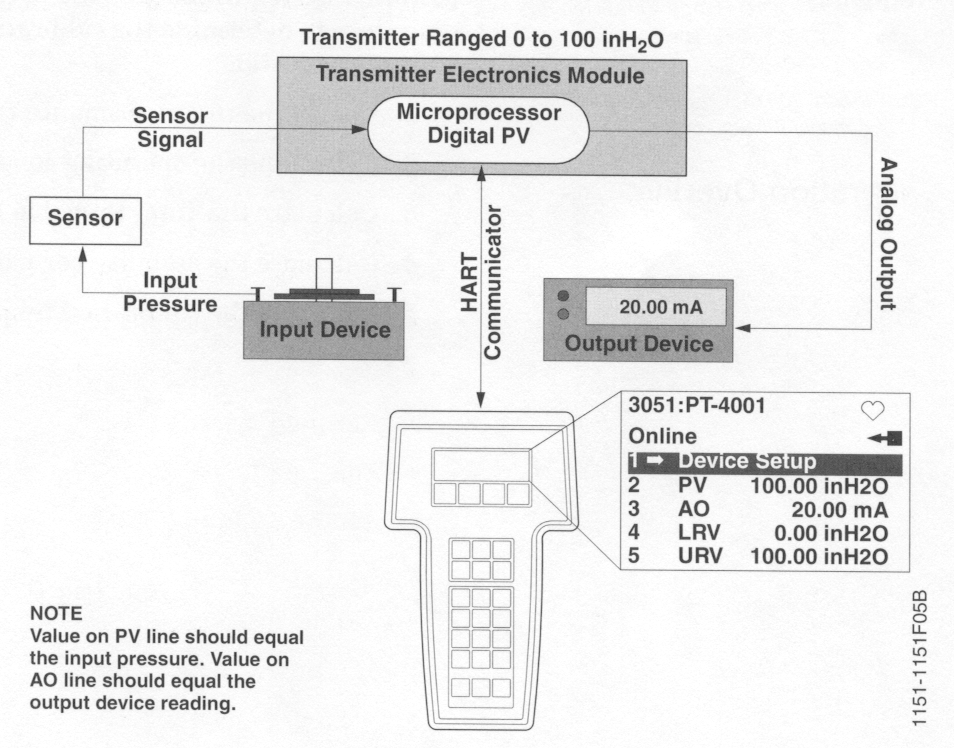
- Connect a primary device, such as a dead weight tester or a decade box, to the input of the transmitter. Make sure the primary device has been certified. The setup should be similar to the figure below. In this figure, a HART communicator has also been connected to aid in programming a smart transmitter.
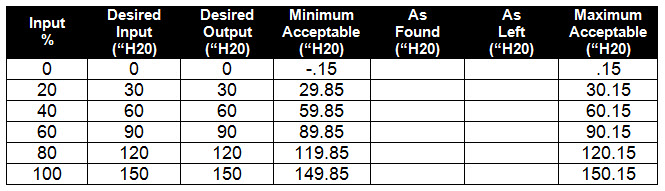
- Record on the appropriate form. A sample chart is shown below for a 0 to 150“ differential pressure transmitter.
- Apply the desired input from the table to the transmitter and read the output. Record it in the chart under the “As Found” column.
- If the “As Found” number is outside of the minimum acceptable and the maximum acceptable ranges, then the transmitter must be recalibrated. Even if the readings are inside the limits, but still a bit off, it is a good idea to recalibrate the transmitter.
- Recalibrate the transmitter according to the procedure for that transmitter. This usually involves putting the 0% value of input on the transmitter and zeroing the transmitter to 4 milliamps out. Then, put the 100% value on the transmitter and set the span to read 20 milliamps.
- Perform the calibration checks again as in step 4 and record the values in the “As Left” column.
To learn more about process controls in an easy to use and efficient way, check out our Free Module of the Month, Process Control Fundamentals, available through the new odesie® site at www.myodesie.com.